Nameservers connect your domain name to the server where your website is hosted, making your website accessible on the internet. Whenever you switch web hosting providers or need to update your DNS configuration, you'll need to update your domain's nameservers.
Key Takeaways
- Update Nameservers Correctly – Replace your existing nameservers with the ones provided by your web hosting or DNS provider to connect your domain to the correct server.
- Allow Time for DNS Propagation – Nameserver changes typically take 24 to 48 hours to propagate worldwide, during which your website may temporarily resolve to either the old or new server.
- Avoid Common Configuration Errors – Double check nameserver entries for typos, incorrect formats, missing records, or unsaved changes to prevent website downtime.
- Verify the Changes – After updating your nameservers, use a DNS lookup tool or test your website to confirm that the new configuration is working correctly.
- Keep Your Domain and Hosting in Sync – Whenever you migrate to a new hosting provider, remember to update your domain's nameservers so visitors are directed to your new hosting environment.
TABLE OF CONTENTS
- Key Takeaways
- Domain Registrars vs. Web Hosts
- Steps to Update Nameservers in Trustname Customer Portal
- Common Mistakes to Avoid When Updating Nameservers
- FAQs
Updating nameservers is a key aspect of domain management that allows you to control where your domain points for web hosting, DNS services, or other functionalities. But first, what are nameservers? Nameservers power the domain name system (DNS).
They are specialized servers that resolve your human readable domain name into the server's IP address where your website is hosted. If you have just moved your website to a new host, Trustname makes updating your domain's nameservers super easy. And if your domain is hosted with us, we'll assign the nameservers automatically for you. Let's see how. But first…
Domain Registrars vs. Web Hosts
A domain registrar is a company accredited by ICANN (Internet Corporation for Assigned Names and Numbers) to register domain names. When you purchase a domain name, you're renting the right to use that name for a specified period.
The registrar manages the reservation of your domain name and submits the necessary information to the relevant registry the company in charge of the TLD (e.g., .com, .net, .cn) that you use.
An example of a domain registrar? Trustname! And we are ICANN-accredited.
A web host, on the other hand, is a company that provides the technologies and services needed for a website to be viewed on the internet. They provide space on a server they own or lease for use by their clients, as well as provide internet connectivity to ensure your website is accessible online.
Trustname also provides web hosting services to our clients, giving you all the resources to get your website online.
The roles of domain registrars and web hosts converge when it comes to nameservers. Here's how –
- When you register a domain with a registrar, they initially point the domain to their default nameservers.
- If you choose to host your website with a different company than your registrar, you'll need to update the nameservers at your registrar to point to your web host's nameservers.
- Your web host provides you with their nameserver's addresses, which you then need to enter in your domain registrar's control panel.
- Once updated, when someone types your domain name into their browser, your registrar's nameservers will direct the request to your web host's nameservers, which then direct the request to the specific server where your website is hosted.
If your domain registrar is also your web host (Trustname offers both services), you typically won't need to manually update nameservers. In such cases, they're usually configured automatically when you set up hosting for your domain.
At Trustname, you can update your domain's nameservers easily through the customer portal. Here's a step by step guide on how to do this –
Steps to Update Nameservers in Trustname Customer Portal
- Log In to Your Customer Portal
Begin by logging into your Trustname account with your username and password. Head to the Trustname.com website and click 'Log In'. Fill in your username (email) and password to gain access to your account.
- Navigate to Your Domain's List
Under the 'Domains' dropdown at the top, click on 'Registered domains' to see the registered domains on your Trustname account.
- Select the Domain
Next, click on the domain that you want to configure custom nameservers for.

You'll need to click on the domain name directly. You'll then be redirected to the domain management settings and contact details.
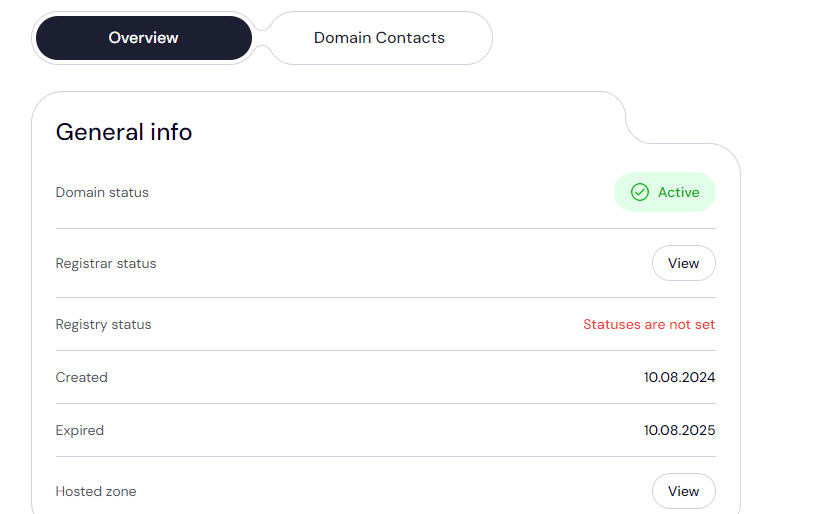
- Access Nameserver Settings
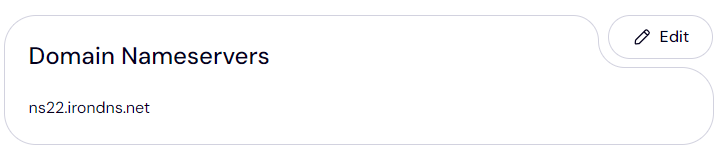
Scroll down to the 'Domain Nameservers' section to see the nameservers currently linked to your domain name. If you are pointing your domain to another registrar to Trustname, look for settings labeled "Manage Nameservers", "Nameservers" or similar.
Click on 'Edit' to begin configuring your domain nameservers.
- Save Changes
After entering the new nameservers, save your changes by clicking the "Save" or "Update" button. You may receive a confirmation message indicating that the update was successful.
- Verify the Update
It may take some time for nameserver changes to propagate across the internet. Use a DNS lookup tool to verify that your new nameservers are correctly set. If you are pointing your domain to a new host, check after the specified time that your website is now live.
Common Mistakes to Avoid When Updating Nameservers
- Adding "https://"
Do not include "https://" or any other URL prefixes when entering nameserver addresses. Nameservers should be entered as plain text (e.g., 'ns1.example.com'), without any additional prefixes.
- Typos or Misspellings
Ensure that nameserver addresses are entered accurately. Double check for any typos or misspellings, as incorrect entries can lead to domain resolution issues.
- Non-Existent Nameservers
Make sure that the nameservers you are entering actually exist and are operational. Using nameservers that do not exist or are incorrect will prevent your domain from resolving properly.
- Incomplete Nameserver Entries
Some domains require multiple nameservers (e.g., 'ns1.example.com', 'ns2.example.com'). Ensure you enter all the required nameservers provided by your service provider. Missing nameservers can lead to partial or complete outages.
- Incorrect Format
Nameserver addresses should follow the correct format, typically consisting of a hostname (e.g., 'ns1') and domain (e.g., 'example.com'). Avoid using IP addresses or incorrect formats.
- Failure to Save Changes
After entering the new nameserver addresses, make sure to save or apply the changes. Not saving the changes will result in the nameservers remaining unchanged.
FAQs
Yes, when you switch to a new web hosting provider, you'll typically need to update your nameservers to point to the new host's servers. This ensures that your domain directs traffic to your website on the new host.
Nameserver changes typically take between 24 and 48 hours to fully propagate across the internet. During this time, your domain may intermittently resolve to the old or new nameservers.
Verify that you have entered the correct nameserver addresses and that they are operational. Check the DNS settings and contact your hosting provider if issues persist.
No, nameservers should be entered in the format of hostnames (e.g., ns1.example.com) and not IP addresses. Ensure you use the correct nameserver format provided by your DNS service.
If you notice that the nameserver is incorrect, immediately log back into the customer portal, correct the nameserver entry, and save the changes.
Yes, when changing web hosting providers, you will need to update your domain's nameservers to point to the new hosting provider's nameservers.
Use a DNS lookup tool or service to check the current nameservers for your domain. This will confirm if the nameserver changes have been successfully applied. You can also test that your website is loading as it's linked to your new host.
Was this article helpful?
That’s Great!
Thank you for your feedback
Sorry! We couldn't be helpful
Thank you for your feedback
Feedback sent
We appreciate your effort and will try to fix the article